WordPress

WordPress is a widely used CMS (content management system) written in PHP, which gives an intuitive interface for creating content, modifying, and managing all-in-one a site.
WordPress is a free open-source software with no hidden prices, you can modify source code or use it as-is without none limitations.
WordPress expands functionality with a simple but genial model: plugins can be added for every feature you want. There are a thousand plugins free or paid for for every task, you choose that based on your skill level or if you want to pay for professional plugins.
As tradeoff, I want to advise many functionalities can be done with a configuration server if you have an hosting it can be possible and your skill have a correct knowledge about that.
In general I prefer a configuration server than a plugin doing the exact things. Security is higher and it consideraly speed up the site.
Every installed plugins must choosen after an evaluation more deeply from advantanges and disavantages. You can have a unknown slow site and must search disabling one time plugin for see if it speed up the site.
Remember the speed of site it connects with SEO, it influences directly your organic search hints, so don’t dumb verify more attently every choose you do it, and don’t be lazy if you can do that with configurations.
What’s Apache?
Apache Web Server is a free, open-source web server for delivering contents trough internet.
In few years Apache is defined well-known world-wide most used http client, as named Apache and remaining a standard de facto for delivering contents.
How to install Apache
What we want discuss about installing on AWS EC2 instance server a Apache Web Server .
Before we could be up-to-date all software on instance and flag autoset on YES for all updates you have.
sudo yum update -y
We must install httpd service (as known Apache) using yum package manager.
sudo yum install -y httpd.x86_64
We could be start the httpd service:
sudo systemctl start httpd.service
We configure httpd as service automatically running at reboot
sudo systemctl enable httpd.service
If you configure httpd, in particular httpd.conf, httpd-le-ssl.conf it’s useful before to launch httpd start command, launch this command for testing if httpd configuration is correct.
It very useful because it show verbose logs regarding error configurations files, more deeply than normal logs starting.
apachectl configtestLet’s Encrypt
Let’s Encrypt it’s a free open certificate authority, it permits to install on your web browser a TLS certificate with a few command-line terminal.
Let’s Encrypt it’s a necessary tool for making our site delivered on SSL if we use apache on AWS EC2 instance.
We must before installing certbot and the module for configuring apache
sudo yum install -y certbot python2-certbot-apache
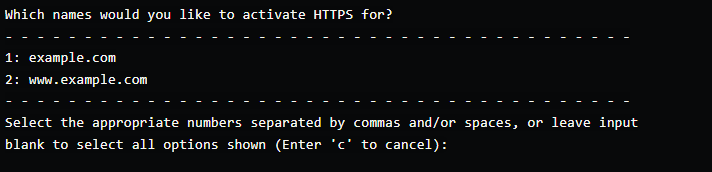
Certbot permits to automate the creation of Let’s Encrypt certificate, if you execute it with parameter –apache and apache it’s running you can simply verified the ownership of website.
After installation, we can run through the wizard to generate the certificate. In this step certbot show all virtual host configured in httpd.conf file
sudo certbot --apache
We can issue certificate for any number of domain, so Let’s Encrypt can provides SSL certificate for every public websites.
Manage HTTPS
Httpd ensure management https and SSL very well, for achieve that you can use Open SSL, if you use website in Intranet you can generate ones from terminal, or if you have a public website you can use Let’s Encrypt how we discuss in previous chapter.
For setup httpd you need to add on head of httpd.conf and include a conf files for defining all virtual host regardings 443 port configurations.
LoadModule ssl_module modules/mod_ssl.so
Include conf/extra/httpd-ssl.conf
If you want to edit the configuration file about SSL you can use “vi” command
vi /etc/httpd/conf/httpd-ssl.conf
<IfModule mod_ssl.c>
<VirtualHost *:443>
   DocumentRoot "/var/www/html-example"
   ServerName "http://example.com"
   Include /etc/letsencrypt/options-ssl-apache.conf
   ServerAlias "http://www.example.com"
   SSLCertificateFile /etc/letsencrypt/live/www.example.com/fullchain.pem
   SSLCertificateKeyFile /etc/letsencrypt/live/www.example.com/privkey.pem
</VirtualHost>
</IfModule>
MariaDB install on AWS EC2 instance
MariaDB is an open-source database forked from MySQL. It’s fast and work with SQL query, sharing the same driver connection as ODBC, and mantain until 8.0 retrocompatibility from same version with Mysql.
You can see what are the MariaDB version installable using amazon extra
sudo amazon-linux-extras | grep mariadb
For installing MariaDB it’s necessary
sudo yum install MariaDB-server MariaDB-clientEnable autostart after reboot, enable that services system
sudo systemctl enable --now mariadbStart the database server.
sudo systemctl start mariadbLog in to the database server as the root user. Enter your database root password when prompted;
One best practice is run Mysql secure installation, disabling anonymous users, remote logging, test database and more.
sudo mysql_secure_installation
It’s necessary to stop the service and restart for make active all changes.
sudo systemctl restart mariadbAfter that we can connect to the database with root user and password we just choose.
mysql -u root -pCREATE USER 'wordpress-user'@'localhost' IDENTIFIED BY 'your_password';Create your database. Give your database a descriptive, meaningful name, such as `wordpress-db`.
CREATE DATABASE `wordpress-db`;Grant full privileges for your database to the WordPress user that you created earlier.
GRANT ALL PRIVILEGES ON `wordpress-db`.* TO "wordpress-user"@"localhost";Flush the database privileges to pick up all of your changes.
FLUSH PRIVILEGES;PHP
which amazon-linux-extras
sudo yum install -y amazon-linux-extras
sudo amazon-linux-extras | grep php
sudo amazon-linux-extras enable php7.4
sudo yum clean metadata

sudo yum install php php {pear,cgi,common,curl,mbstring,gd,mysqlnd,gettext,bcmath,json,xml,fpm,intl,zip,imap}
WordPress backup script on AWS EC2 on AWS bucket S3
WordPress backup directory, make daily dump of WordPress database, have a copy of configuration files it’s a first principle for manage server and make relialable a website.
I make a good point to start write a backup script, feel free to copy modify, but write me what are the changes you made and what are the improvement you add.
nano backup.sh
chmod u+x backup.sh
#!/bin/bash

# Get the bucket name from an argument passudo sed to the script
BUCKET_NAME=allerenitalie.com
DIRECTORY_PATH=/home/ec2-user/backups

NOW=$(date +%Y%m%d%H%M%S)
SQL_BACKUP=${NOW}_database.sql
FILES_BACKUP=${NOW}_files.tar.gz

DB_NAME=$(sudo sed -n "s/define( *'DB_NAME', *'\\([^']*\\)'.*/\\1/p" wp-config.php)
DB_USER=$(sudo sed -n "s/define( *'DB_USER', *'\\([^']*\\)'.*/\\1/p" wp-config.php)
DB_PASSWORD=$(sudo sed -n "s/define( *'DB_PASSWORD', *'\\([^']*\\)'.*/\\1/p" wp-config.php)
DB_HOST=$(sudo sed -n "s/define( *'DB_HOST', *'\\([^']*\\)'.*/\\1/p" wp-config.php)

# Backup database
mysqldump --add-drop-table -u$DB_USERNAME -p$DB_PASSWORD -h$DB_HOST $DB_NAME > ./backups/$SQL_BACKUP 2>&1

# Compress the database dump file
gzip ./backups/$SQL_BACKUP

# Backup the entire public directory
sudo tar -zcf ./backups/$FILES_BACKUP /var/www/html

sudo tar -cvpzf /home/ec2-user/backups/httpd.tar.gz /etc/httpd

# Remove backup files that are a month old
rm -f ./backups/$(date +%Y%m%d* --date='1 month ago').gz

# Copy files to S3 if bucket given
aws s3 cp $DIRECTORY_PATH/$SQL_BACKUP.gz s3://$BUCKET_NAME/ --quiet --storage-class STANDARD
aws s3 cp $DIRECTORY_PATH/$FILES_BACKUP s3://$BUCKET_NAME/ --quiet --storage-class STANDARD
aws s3 cp $DIRECTORY_PATH/httpd.tar.gz s3://$BUCKET_NAME/ --quiet --storage-class STANDARD
After create file bash you can edit crontabss:
Add a line:

24 18 28 * * cd /home/ec2-user/; /home/ec2-user/backup.sh